This time last year the electricians were doing the second fix in the workshop and I was hurrying to get the place ready so I could fetch Tash, the cat and a van full of our belongings from London.

People haven’t stopped asking me when I think we’ll be in the house. Moved in, that is. Previously I’ve refused to put a date on it and though I still see no great virtue in setting a date I’m hoping we’ll be in by June. If we’re not it doesn’t much matter but we’re both looking forward to the work being done, enjoying the house and exploring more widely and more often.
Monday (23/08/21): Back in the shower room I reassembled the plumbing and set up the pressure test again…
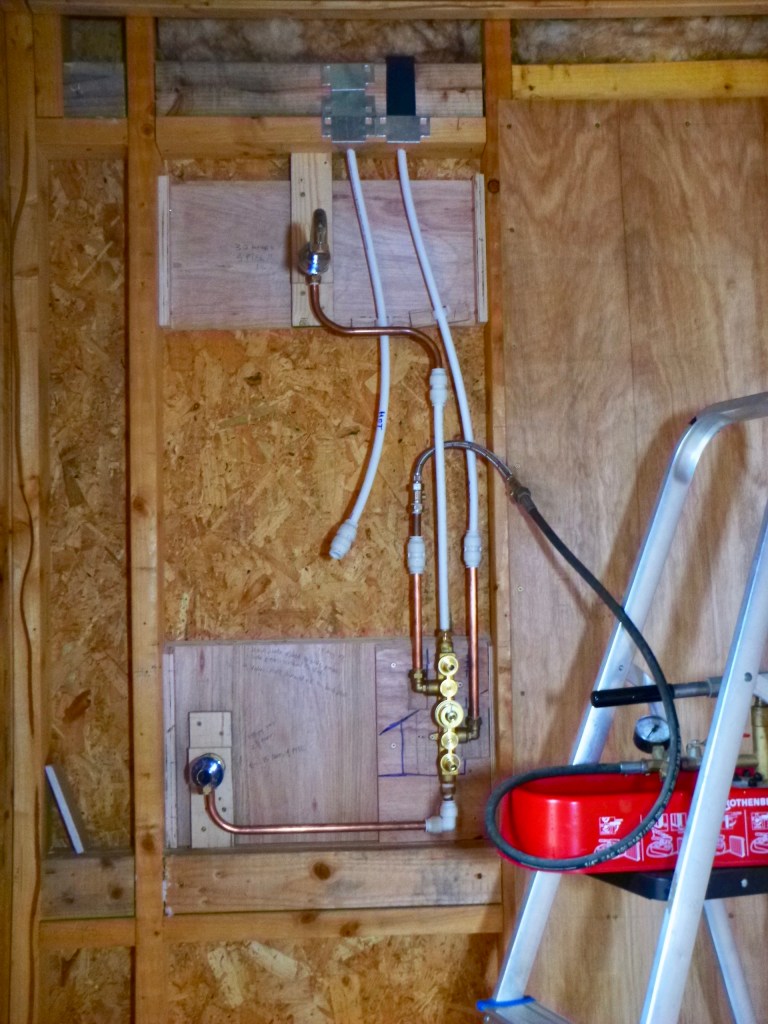
No leaks – hoorah for thread sealant!
Next thing was to hide all the drama behind a sheet of 18mm plywood. Those wall plates into which the shower outlets will screw are both set on little wooden plinths, each made to measure so that when each outlet is fully screwed in it sits tight against the wall. Both plinths are different and both pushed the wall plates out so that the ply sheet had to be counter-bored on the back…

To ensure I drilled the holes in the right places I took measurements…

but also used a gauge stick from which I could transfer a mark directly onto the plywood. Both holes worked out pretty well with only one needing a millimetre and a half adjustment on one side. If it works as well upstairs I’ll be pleased.

Tuesday: So that’s it, all hidden. To the left (west) there’s now another ply sheet tacked to the wall. It can’t be fixed until I’ve decided where I want the electric cable to come out for one of a pair of lights beside the window (which might mean deciding which lights I want). Much of the day was spent sitting in the shower room, measuring, sketching, thinking. I needed to decide how the boxing will work to hide the toilet cistern and support the basin, but at least this one’s fairly straight forward. Upstairs is a different, funny shaped kettle of fish. How much of the structure needs 18mm ply and how much is there left – I’ll need some upstairs too for the wall cladding as specified by Building Control. A quick check revealed one full sheet and just over a second sheet made up of three long pieces, plus an odd bit. Looking upstairs I find I need about half a sheet to finish one wall of the shower plus more than a whole sheet on the wall with the pocket door – so I spent the end of the day transforming the odd bit to fit the upstairs shower space…

I really don’t want to have to order more plywood unless I must, knowing that the prices have gone up several times and it is unlikely to be delivered quickly. I must make the very most of what I have.
Once again, trying to make what seems a simple decision about the shower room structure turns out to depend on other decisions, such as, will the flat top be painted wood or tiled? If it’s tiled how can I cut curves in the tiles to match the basin’s edges? Will the tiles be like those we use on the floor or the wall?
Wednesday: in June I ordered and paid for over a thousand pound’s worth of bathroom hardware from an online store, which arrived bit by bit, except the shower tray and waste (drain hole and trap). I started chasing this two weeks ago and it was only on Thursday that the sales manager rather than some minion phoned me to apologise. He was unable to tell me why it had taken two months for them to tell me their supplier’s courier doesn’t deliver to this address. To cut a long story short an identical but cheaper and differently branded replacement will be delivered on Tuesday and the difference refunded. I hadn’t quite understood until now that some online sales are likely never to grace the premises of the people you buy from, and are sent direct by one of their numerous suppliers, which perhaps explains how one company can offer such a huge range of goods – no wonder communications can go awry. After the phone call I went back to fitting the upstairs bathroom shower, applying the lessons recently learnt downstairs.
Returning from lunch I viewed my morning’s work and saw I could improve the layout, moving taps (valve) and hand-set to one side (right) to create a larger, clutter free area under the rain head. It seemed such a worthwhile improvement that I didn’t mind changing what I’d already done.


As the bathroom stud wall is backed with OSB, something more substantial is required to attach the weighty shower mixer valve. It must also ensure the taps stick out just the right amount, through ply wood and tiles. I refined the base with cutouts, making it easier to get a spanner on the brass connections that screw into the valve.
Thursday: I bent several pieces of copper pipe to connect the plastic plumbing, shower outlets and valve, saving on preformed push-fit elbows where possible but also enjoying the process, and made all the push fit and compression connections I could, before using the end of the thread sealant on the screw connections into the valve body.
Lisa and Alan, London friends staying nearby, came for coffee and the tour, a nice change to my own company while Tash is in London, though my lack of biscuits felt like a bit of a hospitality-gap. Neighbour Fiona popped by to reclaim some borrowed tools and make sure I was okay and not having full blown conversations with the cat. I worked late preparing for the next day’s work with Patryk: cutting wood packers; clearing the decks (living room and stairwell); laying out components; checking assembly details (so far as I could) and, after a late supper, fetching a minimum of light weight scaffolding again from next door in case it might help us put up the top flight of stairs.


Friday: Eight thirty start. Patryk, accomplished carpenter and builder took charge.

He was surprised by the lack of a full drawing and the way nothing was marked or identified, including the risers, seven anonymous rectangles of MDF of several different lengths. In the event two had to be cut shorter and one was too short for any location. We laid out the six similar but different tapering winders and could only work out which was which by fitting them into the various slots in the central newel post then checking them against the rebates in the stringers, after which we numbered them. Even so we weren’t quite sure. We agreed we’d be doing a temporary fix, with everything subject to change and after some inspection, introspection and measuring we slotted the bottom, factory assembled flight into the central newel post and heaved the top flight up into its approximate position – Patryk up the step ladder and me on tippy-toes with the stairs on my head. A good thing they are not oak, he said. So much for scaffolding.

Once we had two blocks screwed to the trimmer (beam catching the ends of the floor joists and making one end of the stairwell) to hold the top of the stairs in about the right position and allow further checks, we had enough confidence to glue and dowel the two shorter newel posts onto the upper flight as well as its riser and nosing that bring you to the landing. I had no shortage of strong wood glue but hadn’t thought about possibly needing to take glued pieces apart and that it started to set in five minutes leaving insufficient time for the calm handling, glueing, assembly, manoeuvring and securing of several pieces. It was obvious once we actually got down to it and luckily Patryk had 500ml of runny white wood glue in his van and I had a couple of small brushes. We proceeded steadily, adjusting the spacing from the two side walls and the back wall as we went, checking the verticality of the central newel post, supporting things as needed, until we came to fit the winders. They were impossible to fit with the back stringer in place – which we’d already glued. Just as well we’d used the slower glue, allowing us to pull the joints apart and clean off the glue. We ended the day debating how to overcome a worrying impasse. After reconnecting the back stringer on one side only, and fitting in the winders (also dry) it was fifteen millimetres too short to connect with the far side. Patryk spotted a couple of routed joints on the stringer, that with skilled attention from his chisel were made more snug, but the gap still remained and we parted at six. He was disappointed not to have got further and though he owed me only a day’s work he said he’d return in the morning.

Saturday: eight o’clock start. Patryk arrived on the dot, said he’d been thinking about it and the problem might be worse than we’d thought. Turns out he was wrong. He was generally several steps ahead of me, better visualising the knock-on effects of altering what we had; a cut here might improve this but might make that, over there, worse – hmmm! The previous evening we’d mooted planing the edges of several winders by just a couple of millimetres each to see if it helped. We went ahead and found the fifteen millimetre gap unexpectedly reduced. A couple of further routed joints in the newel post were judiciously chiselled then something happened as we pushed and pulled, something shifted, twisted, and the joint closed. Although we still had to take it all apart and repeat the procedure with glue, we knew it was possible.

We managed to reassemble the winding and with all the treads in place the pressure was off. Fitting wedges (to support the treads) and their risers (vertical backs of treads) was relatively easy, though still needed some fettling, Patryk’s planer and our multitools (and sanding attachment) proving invaluable. The thin white glue was running out but as the structure was now correct and fixed my fast setting glue came into its own. Treads and risers are located in slots in the stringers or in the outer stringer and newel post, and each riser slides up into a slot under the nose the tread above, while the bottom of the riser overlaps the tread below and is screwed into its bottom edge; everything is glued! To add strength and reduce or eliminate squeaking, triangular blocks are glued (and pinned) into the angle at the back of tread and riser. Once this was all done we stood back and took some deep breaths. Patryk had done his bit and I could take it from here.

First ascent: after this snap Patryk handed back my phone and I bounded up the stairs, where, going before me my nose encountered the edge of the strip of OSB we’d screwed across the top newel posts to keep them straight…

So, industrial injuries apart what do we think of Stairbox? We agreed the kit was well made but with some minor room for improvement. A bit of simple explanation would be a BIG help, making the experience better and surer – such as a 3D drawing with simple annotation. Numbers on parts would save time, anxiety and mistakes. The slots in stringers and newel posts are cut at 90 degrees to the surface – that’s what routers do, but on a winding the treads and their attached risers slot in at an angle – this is what Patryk adjusted (quite quickly) with a chisel or multi-tool but it was essential to getting a good fit. If this was pointed out one could prepare for it.
I shall be talking to Stairbox to let them know my thoughts and ask for a riser of correct dimensions to replace the mysteriously short one, but over all I’m really pleased. The kit is sound and Patryk was a star. I owe him a pot of glue and a day’s pay. On Monday there’s still plenty for David and I to do, most importantly replacing the temporary spacers with full lengths of carefully cut timber screwed securely to the walls. There are a few fiddly, angled blocks to make and glue in place and all of the landing balustrade to sort out…
Now where’s that bank holiday?

